
Free FL Studio Tutorials With Law-Cash, In This Blog I Will Be Helping You Guys With FL Studio Tutorials And Everything About Music Production, If You Need To Learn About Anything Just Ask Me
Friday, September 5, 2014
FL STUDIO TUTORIAL ON THINGS YOU DON’T USE IN FL STUDIO
FL STUDIO TUTORIAL ON THINGS YOU DON’T USE IN FL STUDIO
Hey guys today I do not want to waste much of your time, but I never heard any one talking about this tutorial before. The tutorial that I am going to show you is about things you see every day in FL Studio but have not yet tried them even though they are the most useful. I am talking about the Ghost channel Randomizer and Quick Quantize etc there are lot of things which you don’t use in FL Studio but today I decided to do tutorial about those three.
Ok guys let’s start with Ghost channel
You have been working on a beat for about hours and sometimes you forgot the midi keys for example you are working on pattern fifty and you forget about the melody key which is all the way down in pattern two and you now have to scroll all the way down to that pattern and it all that takes time. So today I have a solution for you guys, you don’t have to waste that much of your strength simply use ghost channel. Simply activate the ghost channel so that it will help you see the other instrumental notes from the previous pattern to the current pattern.
Now let’s talk about Randomizer
I know most of you don’t use this tool and I know it might be because you never heard of it anywhere or you think maybe it would destroy your creativeness but hey why don’t you guys give it a try?
Load any sample or instrument in to the step sequencer and then turn in to piano roll then turn back to then find the way back to the step sequencer and right click on sample you added, after that again turn in to piano roll and look for the virtual score I recommend you to look in the settings panel of the piano roll. You can come across it on the top left corner. Now that you find it click on the icon that looks like a wrench and then examine the drop down menu you will then see a lot of tools being right above the last one. Use ALT + trigger tool
The mainly significant source of Randomizer is to create notes randomly in specific chords. Trust me this tool really saves time. Now let’s come to our last step now.
Our last step is Quick Quantize
I typically recommend quick quantize for people who use Midi keyboard, if you most likely had been experiencing with latency, therefore your piano melody is harmonized with the beat and edit it
FL STUDIO TUTORIAL ON MIXING INSTRUMENTS
FL STUDIO TUTORIAL ON MIXING INSTRUMENTS
Hey guys, I have been seeing some post in some blogs where people are really in need of tutorial on how to mix their instrumentals like drums and etc, so here I am today, helping with a simple tutorial. I know it’s going to help lot of people out there to make quality beats, as you all know that you can’t produce quality beats without good mixing, mixing is the most important step which you should pay lot of attention on. Even though the mixing is always different according to the type of beat you produce, you have to find a simple way in order to improve your mixing skills.
The first instrument that I’m going to show you about is Drums I know your beat might be sounding very well because you managed to create good melodies but without mixing the drums, your kicks will not be well balanced, ok first if you are about to make your drums sound more louder in volume don’t just adjust your mixing channel to 120db that can really ruin your kick sound, trust me, so that step can be easily done with the following effects Compression and Side chaining you may also want to cut off the bass frequencies, in order to cut off the bass frequencies I recommend you to use Parametric EQ or any Equalizer but you have to be more aware that it doesn’t get in the way with the sub range
Now let’s come to another instrument called Synths this is one of my favorite instrument that I always use when I am making beats, make sure that your synths don’t get in the way with the subs , so in order to do that you have to cut off the bass and also you may want to bring out texture so slightly boost so that the frequency will be higher
We are done now this is our last step; our last step is about mixing the Sub Bass I recommend this mixing to any type of bass, basses should be completely isolated, I usually let them only be heard from 0 to 200 Hz
Mixing is very simple as that guys, so guys you don’t have to struggle very much trying to figure out so many things on your own while I am here, as long as I am here all problems are solved.
That’s it for today guys if there is something which you didn’t manage to understand very well please just comment then I will be able to assist you.
FL STUDIO TUTORIAL ON HOW YOU CAN REMOVE MICROPHONE BACKGROUND NOISE WITH; Edison, Fruity Multi Band Compressor, Limiter, Reverb 2 and Parametric EQ.
FL STUDIO TUTORIAL ON HOW YOU CAN REMOVE MICROPHONE BACKGROUND NOISE WITH;
Edison, Fruity Multi Band Compressor, Limiter, Reverb 2 and Parametric EQ.
Hey, I’m back with a different method on how to remove microphone background noise. As I always mention that there are so many ways to do one thing but in different styles or method so I am here with another strategy on how you can get rid of that very annoying background noise, I know a lot people out there are very confused on how they can remove it, and it also make some other people keep on buying new microphones all over again but their problem never came to the end, but today I want you to say good bye to that noise because I have the solution with me, which is free it only require your time
Today we’re going to remove microphone background noise completely with the following plug ins and effects such as Edison, Fruity Multi Band Compressor, Limiter, Reverb 2 and Parametric EQ
First of all record your voice in Edison after recording right click on it go to tools and select normalize then listen to your recording and make sure you are hearing that background noise, in Edison there is a brush button, I want you to click that button and a Clean up (Denoise) will pop up, adjust the amount all the way down to 15.4 or 3.0, turn threshold to 0.50 and declipper sensitivity threshold to maximum from there accept and then send your vocal to playlist by simply pressing the playlist button Assign your vocal with one channel in the mixer and add fruity multi band compressor in that channel or slot.
Now go to fruity multi band compressor and look for present named “vocal” and load it, once it have loaded I need you to look for Left frequency gear , once you find It, i recommend you to turn it all the way to the right till it reach 7121, now look for Medium Frequency L and turn it to the right side till it reach 9376 Hz, then look for Medium Frequency H and turn it all the way down to the left now let’s come to H frequency and turn it to 7921 Hz and listen to your vocal if you were working while you are not listening. But what I recommend is to change things when you are listen so that you can know whether you go too harsh or not with the process.
Now add fruity limiter in that same slot or channel and do not choose any present let’s use the current one which is default, now let’s work on the right hand side in “noise gate” and turn gain all the way down to zero, and again add Reverb 2 in that same slot or channel then turn the wet level to 10%.
Now let’s come to our last effect, Add Parametric EQ and move number seven up to 6.0 db and then we’re done your vocal is sounding good now and we are good to go
Thanks for your time guys I really appreciate it, if there is something which you didn’t understand very well please just comment with your problem then I will help you.
Wednesday, September 3, 2014
Fl STUDIO PAGE DISCUSSION
Fl STUDIO PAGE DISCUSSION
Hey guys….
How are you all doing? I am first class as at all times, I have been thinking on the subject of this blog of ours. I was thinking of a method which will be capable of keeping us extra closer, for the reason that at this moment you guys can’t all the time stay on line in this blog, so what I have been thinking of it’s a way that will keep us online all day long or as long as you guys can.
So I decided to make a discussion page, where we will be able to write our own problems and share some brain storming, teach others what we know, so that we can all grow big guys.
So what do you say guys? Should I create it? Will it cause any problems? What’s going to happen? You guys won’t comment?
Okay share your opinions with me by commenting… Oh, hey guys I almost forgot I think there must also be some rules there huh?
Ok let me list some of rules.
1. Rule number one let’s not insult each other because we’re only here to help each other.
2. Before asking for tutorial first you have to check all over this blog in order to see if it’s already written.
3. Do not criticize someone’s post because we’re not here to judge other people’s ideas if you think someone’s post was not good enough, you have to simply come up with yours.
4. Do not post anything which is not related to FL Studio because this blog is created for fl studio tutorials only. You can also other rules.
I also have a small tutorial for you guys which I would also teach you here.
The tutorials that I’m going to teach you now is for doing track fade in and fade out without using Edison.
Drag your track or whatever thing which you wish for to do fade in or fade out on, and put in the play list after that put together it with any channel slot from there click the master channel and right click on the master channel you will see option saying Automation Clip click it and after that check the play list you will see it laying in the play list move that knob in order to fade in and out, that’s it the Automation is done.
Simple as that.
Tuesday, September 2, 2014
FL STUDIO TUTORIAL ON HOW TO REMOVE VOCALS FROM THE SONG
Hey guys, today I’m back with the best tutorial ever, I’m a facebook user and I spend lot of time on line, I’m on a group called We make music in FL Studio so every day I see one post from different people saying how to remove vocals from a song, so that they can use the beat or vocals as an accapella at first I thought it is impossible until I came to my senses and explore this method, and here I am today sharing it with you guys and I know there are lot of fruity loops users out there who are very interested in removing vocals from the song or track, so this tutorial can be very usefully to them, so that they will be able to do remixes and etc, but hey removing vocals is not really going to be easy as singing a,b,c before we get to the instruction make sure that the vocals in that track are panned to the center though you might experience some issues.
Let’s start with our tutorial I involve you to have 3 tracks, I mean the similar tracks in order to make this procedure work, add the first track then side chain it and then the stereo shaper should be added.
After you have reduced the left and right channels on the first copied track you will add maximus.
With maximus we will make it so that you are only phase cancelling the frequencies you wish for .
now maximus will permit you to part the low and high band frequencies.
You will then be using another instance of maximus.
And after that one will be used to get rid of the highs along with mid range frequencies at the same time as the other will be doing the correct reverse
After you’re accomplished by means of that you will after that be creating a control panel to control together maximus by means of one control knob, which will permit you to fine tune the frequencies that are being phased out.
This is a pretty difficult lesson or tutorial more often than not FL Studio new users, if you guys need a videos tutorial please just comment and I will provide it for you.
Thanks for your moment in time, if theirs is something which you didn’t comprehend very well please just comment and I will make it easy for you, to each and every one I say most excellent to you guys
FL STUDIO TUTORIAL ON HOW TO REMOVE MIC BACK GROUND NOISE

How are you guys doing...? I have been listening to local music, I’m talking about artist who record their songs under home recording studio most of those people are pretty good, but there is something which I heard on their songs and it’s bad, guess what...? It’s the background noise and it’s very much annoying.
So today’s tutorial will be about removing that background noise from your vocals, just give me some few minutes to explain all to you on how you can remove or reduce that annoying noise.
Removing or reducing that noise from your vocals is the most important process that you have take action on, so that your music will be clearer with high quality.
Even though if you are unable to hear that microphone noise I advise you to also take the action which I am going to provide for you, before I figured out this method I nearly quit producing because when I’m mixing the track with that noise, my combination would end up grimy.
Ok… let’s start with our tutorial now
Add fl studio fruity limiter in any channel or the master channel but if you are using the master channel it will apply in the whole track.
Fruity limiter is now our blast or sound gaiting remover, first of all let’s add any vocal which consist of the microphone noise, you can record your audio or let’s use FLS_DontStopNow.wav which comes with FL Studio.
Paste six of them in the playlist then change from PAT to SONG then press play or space bar button then listen carefully you will hear the noise between DON’T and STOP NOW and also at the end of now, if you are unable to hear it, you can also increase your volume to max or listen to it several times.
Fruity limiter is used for compressor, limiter and also noise gate. But today we will only use it for noise removing, look carefully in the fruity limiter you will see NOISE GATE and 3 controls down below it.
If you find that the thresh control is turned entirely down to the left means that there is no thresh, and then the noise gate function is effectively turned off.
From there if you press the space bar to play the audio you will see the thresh (pink line) under the green line.
Now you will have to make that the noise gain and ceil gearshift are set to comparable levels to keep away from the limiter role to jerk in. and at this moment you are still hearing that noise between DON’T and STOP NOW and also at the end.
Now keep the play list playing and increase the thresh a little bit.
MAKE SURE THAT YOU TURN NOISE GATE CONTROL ENTIRELY DOWN TO THE LEFT.
You can also remove back ground noise with fruity love filter as it also offer a noise gate. From me I say make it a habit to reduce the noise in your vocals.
Thank you for your time guys if there is anything which you didn’t understand please just comment and I will help you
BEST FX FOR MASTERING
BEST FX FOR MASTERING
Hey guys you all know it’s your boy Law Cash from Law Cash Records you know I can’t really sleep without giving you a little something to work on, okay today we’re going to talk about best FX for mastering your beats or vocals in order to produce quality things, as you all know that if you want something good you have to work for it, you can’t start doing something today and expect to be the best on it over one night, no!! That can’t really happen
Ok let’s start with FX in vocals, the first FX that I recommend you to add is Reverb, i recommend you to add reverb because reverb is one those FX that are really easy to use when mixing, it works best on isolated.
Add that effect almost in any vocal but you will have to set it up on your own so that your vocal can sound good, reverb also add the quality of your vocal, where ever you apply it, it always brings the best results or quality that’s why I recommend it in all vocals Parametric EQ is an advanced of 7-Band parametric equalizer plug-in with the spectral analysis in your vocals as you all know that equalizer is the most important FX of audio technology.
So without it you can’t really be that good, parametric EQ add the quality to your vocals and make them sound best.
Parametric equalizing is one of the best processes of increasing and decreasing the loudness of specific frequencies in your vocals or instrument.
There is the band type, center frequency and width of each Band which are fully adjustable so that you can set it up on your own. You can also choose from High Shelf, Low Shelf, Peaking, Band Pass, Notch, Low Pass, High Pass or Band Pass filters for each band that you select independently
Delay Bank is one the most powerful delay tools it’s a filter plug in.
This FX consists of 8 banks of the same banks, each of the banks can be fed to the next bank in the chain, to create complex delay and filtering effects, delay also sound like a back up when your singing or rapping, it repeat your last words to make them sound best.
EQUO is the most sophisticated morphing realistic equalizer plug in.
Equalizing is one of the processes that are made for increasing and decreasing the intensity of unambiguous frequencies.
EQUO is mostly suitable to exist or preset tweaking during the performance.
The main display contains both of the EQ and EQ controls so that the sounds can not only be shaped according to the frequency content, but panning can also be applied on the specific frequency basis.
Further, One Master EQ shape and then a further 8 separate EQ/ PAN shapes may be set and then these EQ shapes can be smoothly morphed using the Morph knob in the EQUO Fruity 7 Band EQ is a seven-band equalizer plug in which is opr timtimized for low CPU use.
It is a little bit same as parametric EQ, which provides greater control.
That’s it for today guys, if there is something which you didn’t understand please then I will make it easy for you.
Thanks for your time
Sunday, August 31, 2014
TUTORIAL OF FL STUDIO AND AUTO TUNE
TUTORIAL OF FL STUDIO AND AUTO TUNE
Today I will be doing tutorial of Fl studio together with auto tune evo so that you guys can also be able to sing in Fl studio using auto tune evo, I know there are lot of people out there who are struggling to sing because they really love singing, making music but every time they spit their words out it just turn into something bad more like a construction noise but hey it’s not all of them, but okay forget about that and stop worrying cause I got solution for you guys
Open up your fl studio and record your vocals very nice and gently also make sure that your microphone volume is set to 80 to 100 your microphone boost must be at zero so that auto tune evo can apply well in your vocals (REMEMBER DO NOT BOOST YOUR MICROPHONE)
Now that you have recorded your vocals apply it or them in the channel mixer so that you will be able to control your vocals and add other FX effect in your vocal
Let’s say your vocal is in channel mixer one, add auto tune evo in that channel and now your able to see auto tune evo appearing in Fl studio, right now we have to set it up so that your vocals can sound pretty good
First of all turn all things all the way down to zero on the right side e.g. Rate= zero, Onset delay= zero, variation= zero, Onset rate= zero, Pitch amount= zero, Amplitude Amount= zero, Formant Amount= zero
Now let’s deal with the right side of the auto tune, let’s start with the input type, for my voice I always use Low Male type, low male type input is where my voice sound good
Set tracking to 50 or increase it to 70 but hey the best way of doing this settings is when the vocals are also playing
Lets come to Retune speed (I like this one) if you really can’t sing turn it all the way down to zero but if you can sing you might start decreasing retune speed from 20 to 400
Increase humanize to at least 15
Targeting mark ignore vibrator
Auto tune evo key for my voice I recommend D flat (D#)
In scale choose minor or major if your voice is not sounding good try to change scale, key or retune speed but I mostly recommend you to start increasing or decreasing retune speed if your vocal is not sounding good
That’s it for today.
Thanks for your time guys comment if you there’s something that you didn’t understand
TUTORIAL ON HOW TO RECORD YOUR OWN MUSIC WITH FL STUDIO
TUTORIAL ON HOW TO RECORD YOUR OWN MUSIC WITH FL STUDIO
Hey, guys where I am right now it’s 9:30 PM, just now when I was about to sleep I thought of making these simple tutorial before I go to dream land, because before I became pro with fl studio I used to argue with my friends about fl studio recording stuff, enough of that I do not want to waste your time with old stories.
Fl studio is one of the best recording software also the best beat making program.
What I realized about this program is that most of the people don’t really know how to record with Fl studio, so that is also the reason why I decided to write tutorial on how you can record your music with fl studio.
This software makes it easier for you to record music; you can also make your home recording software with fl studio.
Let’s get started with our tutorial
• MICROPHONE SET UP
First of all open up your Fl studio then press F 10 select audio on the left side of that bar, you will then see input and output select primary driver in there and choose Asio4All v2 then exit that bar and open channel mixer, now that the channel mixer is on top look carefully on the right side of the channel mixer there is a slot and in that slot you will be seeing none, select that none and select your microphone name in there, you will repeat the choosing microphone step on each channel you record with.
Now we’re done with microphone set up
• RECORDING
Now select the recording button and select Audio, into the Edison and Editor/ Record, Fl studio will then start to record.
Press stop when you are done recording, press stop in Fl studio and Edison editor now their all stopped, on the right corner of the Edison editor there is a button which looks exactly like the play list one.
So in order to send your vocal into the play list you will need to press that button and then your vocal will be imported to the play list from there you will need to place it where u started recording at
That’s it for tonight guys if there is something which you did not understand very well please just comment with your problem so that I will be to help you.
Thank you for time
FL STUDIO TUTORIAL OF STARTING BEAT FROM THE SCRATCH
FL STUDIO TUTORIAL OF STARTING BEAT FROM THE SCRATCH
Hey guys today it’s a brand new day so I’ve decided to come up with something new for you guys, okay tutorial for today it’s about starting a beat from the scratch, I will also provide you guys some picture so that it would be easy for you Today you will be learning on how you can make your own beat with FL studio, so right now I want you guys to free your mind and prepare yourself to learn now
• Open up your Fl studio and set up your beat BPM and Then let’s get started I mostly recommend 140 to 160 BPM but if your unable to make your beat sound good or isn’t Fast enough I’d recommend you to set it up as you please but right now in this tutorial I’d recommend You to use 160 so that our beat would sound the same
• Lets first add kits/sound packs that we’re going to use in this tutorial Drug and drop VT_BD kick from packs/ vintage Drug and drop VT_SD in that same folder Drug and drop VT_CHiHat Again drug and drop VT_RimShot_2 in that same folder Now we have 4 sound kits in the step sequencer
I need you to adjust beats per bar for this pattern to 8

• Here is how the step sequencer should look like Do it properly don’t rush things up
• Now view your play list and paste them in Track ONE paste FOUR bars of them
• Now switch from PAT to SONG You will then be hearing it playing from the play list

• Now right click on any sound kit click insert choose fl keys
• Now that is added on step sequencer right click on fl keys select piano roll, now you will be able to see piano notes
• View the step sequencer and change the pattern to TWO on the right side of the TEMPO
• Select play list and place a bar with no notes in Track TWO place only one bar
• Now let’s go back to piano roll of fl keys you can do that by right clicking the fl keys and select piano roll
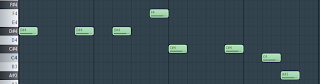
• Now make sure that your notes are exactly the same as the one in picture below

• Now change the pattern number to number THREE then view playlist and place ONE bar in track THREE
• Now add sytrus in the step sequencer and click on the left corner of sytrus then select presents and choose Pizzi
• Pizzi notes must look the same as in the picture below

• Add another syrus in the stp sequencer then choose dream bell in presents
• The bell notes must look as in the picture below
• • YOU MUST PLACE ALL PATTERN IN THE PLAY LIST
• ARRANGE THEM IN PLAY LIST IN WHAT EVER WAY YOU LIKE
• THANKS FOR YOUR TIME GUYS IF THERE IS SOMETHING WHICH YOU NEED TO KNOW ABOUT JUST CONTACT ME
Saturday, August 30, 2014
HOW TO ADD PLUGGINS IN FL STUDIO
Hey guys, it’s me again with something new as always, I received an E-mail 2 days ago, they guy was asking me how he can add plug gins in Fl studio immediately I e-mailed him instruction within two minutes he got back to me saying “thanks”, then I decided to also write about it in my blog so that it will also help others, I know he is not the only one
Ok…. You downloaded some plug gins or your friend gave them to you and you have no idea how to add them in FL studio??? Don’t worry Law Cash is here for you….
Once you install Fl studio on your computer, FL studio automatically create a fold called Vst Plug gins in your local disk in order to locate to that folder open my computer your drive c: go to program files scroll down with your mouse cursor or type v in your keyboard it will locate you to v folders and there you will be able to see Vst Plug gins folder, and there is where all plug ins are installed.
When installing your plug gins be very careful don’t just press next without reading, when it asks you where to install plug gins locate it to install it in vst plug gins, you can also install your plug gins in c: program files, image-line, FL studio 3,4,5,6,7,8,9,10,11, plugins, fruity, effects but I recommend the first method, it works Now that you have successfully installed your plugin lets see it, Open FL studio click view mixer or press F9, select Fx slot option various effect will appear, now click on select and click more then click refresh on the bottom right corner it will then scan if there are new plugins installed in your system they will appear in red colour then you will have to mark them all, and now we’re done with adding effects plugins now lets add VSTi plugins open FL studio and view step sequencer right click on kick or any instrument there then insert, click more, click refresh and then the installed plugins will appear in red color and from there you are good to go.
That’s it for today if you guys need anything regarding FL studio don’t hesitate to contact me at anytime, that is what am here for you can e-mail me at ralinalahulisani@gmail.com
FL STUDIO TUTORIAL ON HOW TO PREPARE MAKING BEAT
FL STUDIO TUTORIAL ON HOW TO PREPARE MAKING BEAT
Today we will be talking about how you can make your own beat in FL Studio (Fruityloops) starting from the scratch, I know some people find it very hard to start making their own beat with FL Studio (Fruityloops) and i heard some people saying FL Studio (fruityloops) is the most difficult beat making software,I used to believe that too but hey!! If we’re talking about the easiest beat making software that would be FL Studio (fruityloops) trust me it is easy as A,B,C ok enough of the chit chat let’s get on it
BEST PREPARETION OF STARTING BEAT IN FL STUDIO
1. MELODY
Always start a beat with a melody in your mind so that you will not stuck in the middle of the mission
2. BPM SETTING
3. BPM is the song tempo to set the Time signature use the mouse scroll to increase and decrease the speed of the beat or Right-click the LCD screen for some tempo presets & commands: Tap - You can now tap the tempo in FL Studio. Click the tap command and you'll see the tempo tap window appear (you can have the song playing before you launch the tap tool). Click the tap icon repeatedly with the desired tempo in mind. You will see the tempo adjust to new levels after some taps. For best results, tap at least 10-16 times until the tempo is stabilized. Click the OK button to accept the new tempo.
4. 80bpm-160bpm - Some commonly used tempo presets.
5. Half speed - Play the song at half the current BPM setting. The value displayed in the Tempo LCD does not change when 'Half speed' it set. This is a temporary state to make it easier to record difficult note/event performances, making it easier to remember what the original tempo was after you are done.
6. Tempo fine tune (smaller digits) - This control lets you fine tune the tempo of the current project in measure of 1/1000 BPM. The value set here will be added to the base tempo. Note that it's not recommended to use that setting when starting a new song (it is better to use a whole number for your tempo). However, it can be used to match the exact speed of another song to be mixed in a FL Studio project (for making using existing sampled loops, 'cover songs'
7. Also get drum kits of other people in order to make quality beats
8. Do not always use one pluggin when making beats in fl studio because fl doesn’t have it all you will have to download some of the pluggins
And that's it for today
Subscribe to:
Posts (Atom)